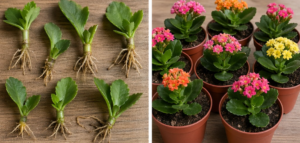
Kalanchoe is a resilient succulent, but its fleshy stems contain a lot of water, making them prone to fungal infections during traditional propagation. The “original” method described here involves a unique approach to leaf propagation that maximizes root development before the plant ever touches soil. This technique is perfect for those who want to turn a single mother plant into a dozen small gifts or a dense indoor garden.
Why This Method Beats Traditional Cuttings
1. Minimal Risk of Rot
By allowing the leaf to “callus” and develop initial root buds in a humid but non-saturated environment, you bypass the stage where most cuttings fail due to soggy soil.
2. High Success Rate
Kalanchoe leaves are packed with nutrient-rich sap. This method leverages those internal reserves to grow a completely new root system without the stress of immediate transplanting. 📈🌿
3. “Clone” Precision
Each leaf produces a genetically identical miniature version of the parent. If you have a specific color or leaf shape you love, this is the most reliable way to preserve it perfectly. ✨🧬
The Original Step-by-Step Propagation Method
Step 1: The Clean Harvest
Select a large, healthy, and firm leaf from the bottom of a mature Kalanchoe. Do not use scissors; instead, gently “snap” the leaf off at the very base of the stem. It is vital to get the entire leaf stalk (petiole). 🍃
Step 2: The Drying Phase (The Secret)
Place the leaves on a dry paper towel in a shaded spot for 2 to 3 days. This allows the wound to heal and form a “callus.” If you skip this, the leaf will simply absorb too much water and turn into mush. ⏳🛡️
Step 3: The “Humidity Tent” Technique
Instead of burying the leaf in dirt, place it on top of a bed of moist sand or a very light peat-perlite mix.
- The Original Twist: Cover the container with a transparent plastic bag or a cut-off bottle to create a micro-greenhouse.
- Do not water the soil directly; instead, mist the inside of the “tent” once every few days. The roots will grow toward the humidity. 🚿🌫️
Step 4: The Appearance of “Babies”
After 3 to 4 weeks, you will see tiny pink roots and a miniature plantlet forming at the base of the leaf. Once the roots are about 1-2 cm long, you can lightly press them into the soil. 🏺✨
Pro Tip for Flowering
Kalanchoe is a “short-day” plant. To make your new clones bloom quickly once they are established, they need 14 hours of total darkness per day for about a month. Covering them with a box from 6 PM to 8 AM will trigger a massive explosion of flowers! 🌸🌙
Leave a Reply