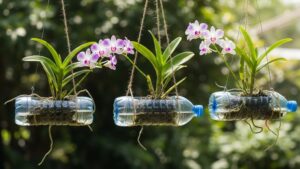
Orchids are often misunderstood as delicate indoor plants that belong in fancy pots, but in reality, they are rugged survivors from tropical rainforests. 🌳 In their natural habitat, they grow as epiphytes, clinging to the branches of tall trees with their roots dangling in the humid air. This article explores a revolutionary DIY method that mimics this environment perfectly: hanging orchids in recycled plastic bottles. This setup creates a self-sustaining “aerial garden” that solves the problem of root rot and reduces the need for constant maintenance. 🌸✨
The Concept of the Hanging Aerial Garden 📝
The reason most people fail with orchids is that they treat them like terrestrial plants. By moving them into a suspended bottle system, you leverage their biology:
- Root Photosynthesis: Orchid roots are green because they contain chlorophyll. Like leaves, they need light to produce energy. A clear plastic bottle acts as a transparent window, giving the roots the “solar fuel” they need to bloom continuously. ☀️🔋
- Humidity Microclimate: By partially enclosing the plant in a bottle, you trap evaporated moisture. This creates a pocket of high humidity around the roots, similar to the misty conditions of a jungle, which prevents the roots from drying out even in a dry apartment. 🌬️💧
- Gravity-Led Drainage: Hanging the plant vertically ensures that any excess water immediately flows away from the “crown” (the center of the leaves), which is the most common place for rot to start. 🛡️🚫
Materials Needed for Your DIY Orchid Tower 🛠️
You don’t need a greenhouse to pull this off; just a few items from your recycling bin:
- Plastic Bottles: 1.5L or 2L clear bottles work best. 🏺
- Hanging Material: Nylon string, thin wire, or even decorative macramé. 🧶
- Ventilation Tools: A soldering iron or a heated metal skewer to make holes. 🌪️
- Bark Mix: A few pieces of large pine bark or sphagnum moss (optional, as some growers go completely soil-less). 🪵🌿
Step-by-Step Construction Guide 💡
- Preparing the Bottle: Cut the plastic bottle in half. You can use either the top funnel part or the bottom base. If using the top, the “spout” acts as a natural drainage hole. If using the base, ensure you drill plenty of holes in the bottom. ✂️🏺
- Side Ventilation: This is the most important step. Poke several holes along the sides of the bottle. This ensures that the roots receive oxygen. Orchids “breathe” through their roots; without airflow, they will suffocate. 🌬️🌀
- The Hanging System: Drill two or three holes near the top rim of the bottle and thread your string through. Make sure it is balanced so the orchid doesn’t tilt. 🏗️⚓
- Positioning the Orchid: Place the orchid inside, letting some roots touch the sides of the bottle while others hang loosely. If you choose to use bark, add only a small amount to hold moisture; do not pack it tightly. 🌿✨
Maintenance: The “Set and Forget” Method 🚿
Because the bottle traps humidity, your watering schedule will change drastically:
- The Misting Technique: Instead of heavy watering, simply mist the roots inside the bottle once every few days. The plastic walls will catch the mist and keep the environment damp for much longer than an open pot. 🌬️💧
- Visual Cues: Look at the roots through the plastic. If they are silvery-grey, it’s time for a misting. If they are bright green, the orchid is happy and needs nothing. 🔍✅
- Light Placement: Hang your aerial garden near a window with bright, filtered light. Avoid direct midday sun, which can heat the plastic and “cook” the delicate roots. ☀️🛡️
Why This Method is a Success in 2026 🌍
This approach combines sustainability with advanced plant care. By upcycling plastic waste, you create a professional-grade growing environment for $0. It’s perfect for small apartments where shelf space is a luxury, turning your windows into a lush, vertical jungle of floating flowers. 🏡🌸
Leave a Reply