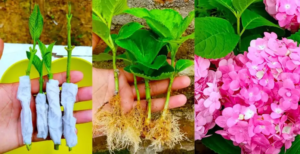
Hydrangeas are the stars of the summer garden, but their price at nurseries can be quite high. If you want to create a long hedge of these beautiful flowers without spending a fortune, the “tissue paper method” is a game-changer. This technique uses a simple household item to wrap the base of the cutting, creating a reservoir of moisture and protection that triggers rapid root growth.
Why the Tissue Paper Method is So Successful
1. Optimal Moisture Retention
The biggest challenge when propagating cuttings is keeping them hydrated without causing rot. Tissue paper (or a thin paper towel) acts as a secondary “skin” that holds just enough moisture directly against the stem, preventing it from drying out during the critical first few days.
2. Physical Protection for Callus Formation
Before roots appear, a “callus” must form at the base of the cutting. The soft paper layer protects this delicate new tissue from abrasive soil particles and minor temperature fluctuations, providing a stable environment for growth. 🛡️
3. Oxygen Exchange
Unlike plastic wraps, paper is breathable. It allows oxygen to reach the stem while keeping it moist, which is essential for healthy cellular respiration and the prevention of fungal diseases. 🌬️🧪
How to Apply the Tissue Paper Propagation Method
Step 1: Taking the Cutting
Select a healthy, green stem from your hydrangea that hasn’t flowered yet. Cut a 10–15 cm piece just below a leaf node. Remove all leaves except for the top two, which you should cut in half to reduce water loss. ✂️🍃
Step 2: The Paper Wrap
- Take a piece of tissue paper or a thin strip of paper towel.
- Dampen it slightly (it should be moist, not dripping).
- Wrap the paper around the bottom 2–3 cm of the stem.
- Pro Tip: You can lightly dust the stem with cinnamon powder before wrapping; it acts as a natural fungicide. 🛡️✨
Step 3: Planting
- Carefully place the wrapped stem into a pot filled with a light, airy substrate (like a mix of peat and sand).
- Ensure the paper remains in contact with the stem as you firm the soil around it. 🏺
Step 4: The Greenhouse Effect
Place a clear plastic bottle (with the bottom cut off) over the cutting to maintain high humidity. Keep the pot in a bright area, but avoid direct sunlight, which could overheat the “mini-greenhouse.” ☀️🌡️
Step 5: Roots and Growth
In 3–4 weeks, the cutting will have developed enough roots to be independent. The paper will naturally decompose in the soil, so there’s no need to remove it, which avoids disturbing the new, fragile roots.
Leave a Reply